
Time Sheet Import and RUN Powered
by ADP®
Processing Your Payroll
GTSG - V0418A
Trademarks
The ADP Logo, ADP, and RUN Powered by ADP are registered trademarks of ADP, LLC.
Small Business OnLine Payroll Powered by ADP are trademarks of ADP, Inc. Adobe, Acrobat, and Reader are either
registered trademarks or trademarks of Adobe Systems Incorporated in the United States and/or other countries.
Android, Google Chrome browser, and Google Play are trademarks of Google, Inc. Intuit and QuickBooks are
registered trademarks and/or registered service marks of Intuit Inc. or one of its subsidiaries. Microsoft, Windows, and
Windows NT are registered trademarks of Microsoft Corporation. Firefox is a registered trademark of Mozilla
Foundation. Sage, Sage 50 Accounting and related Sage marks are the trademarks of Sage Software, Inc. VISA is a
registered trademark of Visa.
All other trademarks are the property of their respective owners.
Copyright © 2012 - 2018 ADP, LLC. ADP Proprietary and Confidential. All Rights Reserved. These materials may not
be reproduced in any format without the express written permission of ADP, LLC.
ADP provides this publication “as is” without warranty of any kind, either express or implied, including, but not limited
to, the implied warranties of merchantability or fitness for a particular purpose. ADP is not responsible for any
technical inaccuracies or typographical errors which may be contained in this publication. Changes are periodically
made to the information herein, and such changes will be incorporated in new editions of this publication. ADP may
make improvements and/or changes in the product and/or the programs described in this publication at any time
without notice.
GTSG - V0418A

Time Sheet Import and RUN Powered by ADP® i Processing Your Payroll
Contents
Time Sheet Import ...................................................................................................... 1
Choose an Employee Identifier ................................................................................... 2
Assign Employee Time Clock IDs ...................................................................................... 2
Set Up Your Time Sheet Import File ........................................................................... 3
Time Sheet Import Template .............................................................................................. 3
Data Resources for Set Up ................................................................................................ 3
File Specifications .............................................................................................................. 4
Time Sheet File Record Layout Using a Payroll Assigned Identifier ................................... 5
Header Record ............................................................................................................... 5
Title Record .................................................................................................................... 5
Detail Record ................................................................................................................. 6
Sample Data .................................................................................................................. 7
Time Sheet File Record Layout Using Your Own Assigned Identifier ................................. 8
Header Record ............................................................................................................... 8
Title Record .................................................................................................................... 8
Detail Record ................................................................................................................. 9
Sample Data .................................................................................................................10
The Payroll Process .................................................................................................. 11
Perform Employee Maintenance ............................................................................... 12
Update Employee and Contractor Information ...................................................................12
Add Employees .................................................................................................................12
How Do I Add a Contractor? .............................................................................................13
Rehire Employees .............................................................................................................14
Terminate Employees .......................................................................................................14
Pay Your Employees and Contractors ...................................................................... 15
Import Time Sheet Data from My Time and Attendance System .......................................15
Fix Errors in the Time Sheet Import File ............................................................................16
Enter Payroll Information ...................................................................................................17
Run Reports .............................................................................................................. 18
Printing Paychecks ................................................................................................... 19
Print Paychecks ................................................................................................................19
Print Direct Deposit Vouchers ...........................................................................................20
Move the Pay Cycle to the Next Pay Period ............................................................. 21
Appendix: Understanding Time Sheet Import Errors ................................................. 22

Time Sheet Import and RUN Powered by ADP® 1 Processing Your Payroll
Time Sheet Import
Time Sheet Import is a feature that allows you to import data from your time and
attendance system into RUN Powered by ADP® each payroll, saving you valuable
time and reducing the risk of data entry errors. You can include imported payroll
data in both regular and special payrolls.
We have time sheet import templates as well as a guide you can use to help walk
you through the process.
To use this feature, Time Sheet Import must be selected on the Company >
Features Overview page.
For information on how to set up Time Sheet Import, contact your Payroll Service
team.

Time Sheet Import and RUN Powered by ADP® 2 Processing Your Payroll
Choose an Employee Identifier
Choose an Employee Identifier
When you import data from your time and attendance system into RUN Powered by
ADP®, the data is mapped to the correct employee using an employee identifier.
You can choose to use one of the following identifiers:
Employee ID, which is assigned by the payroll application
Employee Time Clock ID, which is assigned by your time and attendance
system
If you choose the Employee Time Clock ID, you need to assign the unique ID to
each employee using the Employee Time Clock ID Entry page in the payroll
application.
Assign Employee Time Clock IDs
Starting Point: Employees > Enter EE Time Clock IDs
If you add or change the Employee Time Clock ID while an import is in progress for
the employee's pay frequency, the change won't be included until the next import.
1 Enter the employee's time clock ID in the Clock ID field.
The Clock ID field is displayed on both the Payroll Info page and the Employee
Time Clock ID Entry page. If you enter or change the ID on one page it will be
updated automatically on the other page.
2 Click Save.

Time Sheet Import and RUN Powered by ADP® 3 Processing Your Payroll
Set Up Your Time Sheet Import File
Set Up Your Time Sheet Import File
Before you can import time and attendance data into the payroll application, you
must configure your time and attendance system to output a properly formatted .csv
file. The file specifications and record layout are included in the following sections.
Time Sheet Import Template
For your convenience, we have provided two .csv templates for you to customize.
The template you choose is determined by the employee identifier you use:
Employee ID - assigned automatically by the payroll application
Employee Time Clock ID - assigned by your time and attendance system
You can access the templates after the feature has been activated for your
company.
1 In the payroll application, go to Help & Support, and then open the Payroll &
HR page.
2 Under Time Sheet Import, click the template you want to open the file.
We recommend that you include the pay frequency and pay period start and end
dates in the filename, for example: Biweekly-08172013-08302013.csv
Data Resources for Set Up
RUN Powered by ADP® includes a number of reports that provide the data you
need to set up your time sheet import file:
Department Numbers Report - Lists all the departments set up for your
company, if any.
Employee Codes Report - Includes the employee information (such as
employee code, pay frequency, and status) necessary to integrate data
maintained in your time and attendance system.
Earnings Codes Report - Lists all the earnings codes available in the payroll
application, which can be included in the time sheet import file.
For details on how to run a report, see Run Reports on page 18.

Time Sheet Import and RUN Powered by ADP® 4 Processing Your Payroll
Set Up Your Time Sheet Import File
File Specifications
The pay data file you import into the payroll application must meet the following
specifications:
The file must be in .csv format (comma delimited).
The file type must be .csv.
There are no specifications for the filename you use, but we recommend that
you include the pay frequency and pay period start and end dates in the
filename, for example: Biweekly-08172013-08302013.csv.
The file can include data for only one pay frequency.
The file can include only active employees. Employees with a status of
Leave of Absence will be excluded from payroll processing. Employees with a
status of Terminated before the pay period start date will also be excluded from
payroll processing.
If a number includes a decimal, you must enter the decimal.
Include a minus sign in front of negative numbers.
Client code (IID, or branch code+ADP Code), pay frequency, and the pay
period start date and pay period end date must be the same on every row of
the file.
The file must include rate codes only, not rate values.
The first row of the data file must contain a version number. The second row
must contain the column heading. The third row and subsequent rows must
contain time sheet data.
Time Sheet Import and RUN Powered by ADP® 5 Processing Your Payroll
Set Up Your Time Sheet Import File
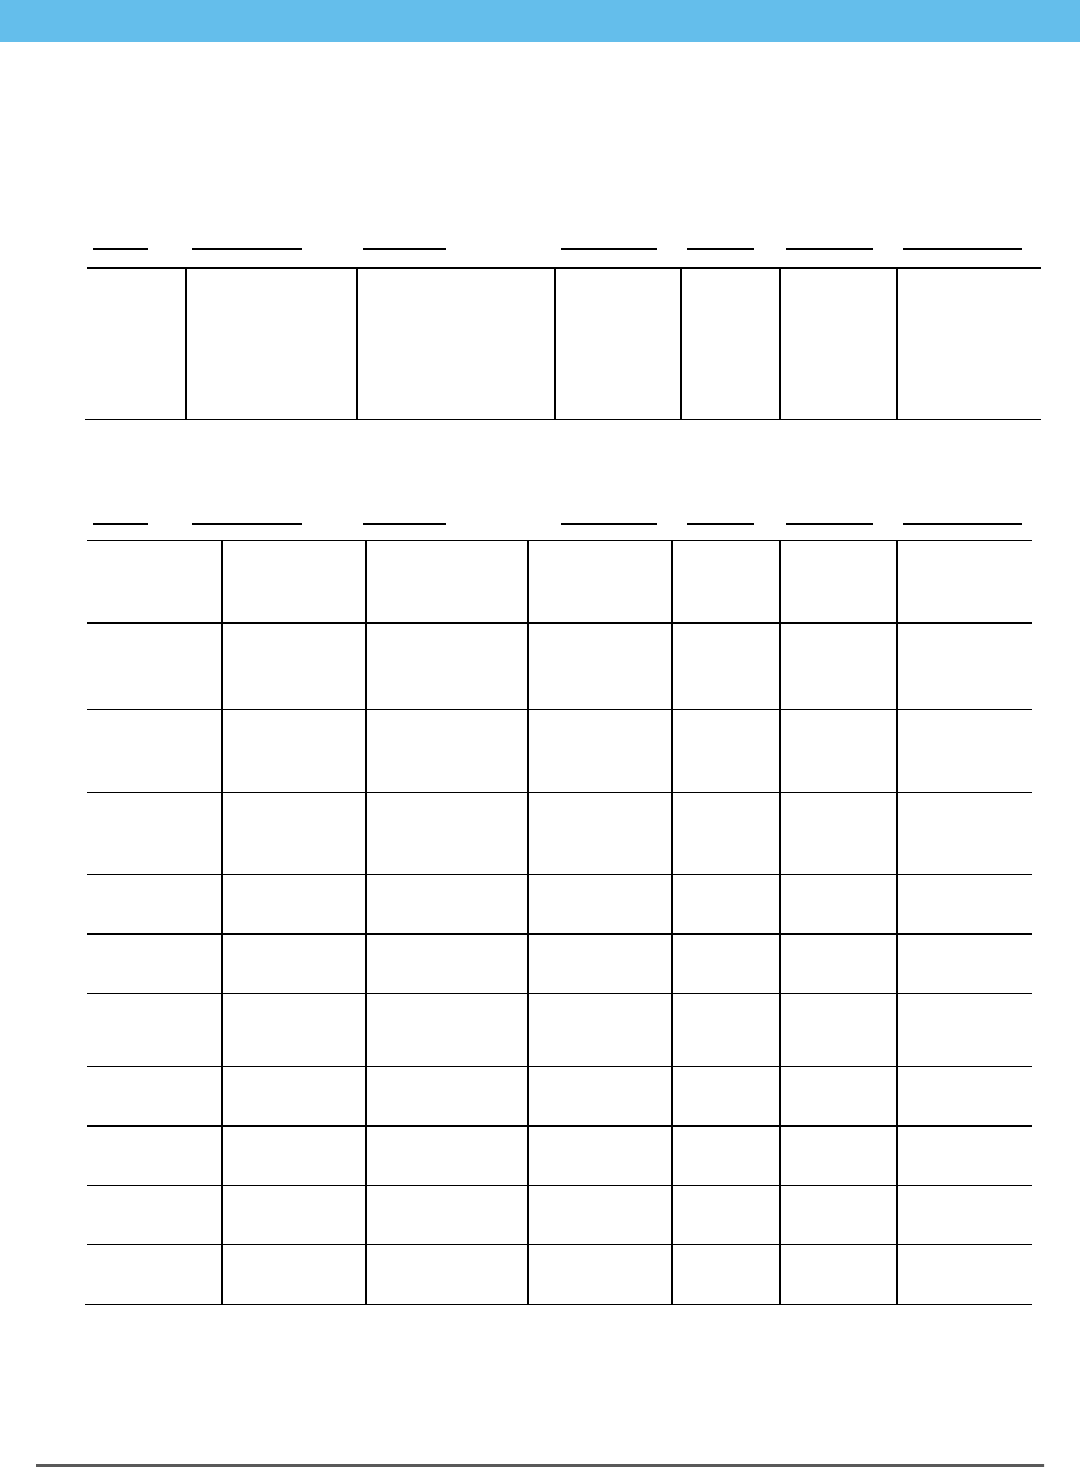
Time Sheet File Record Layout Using a Payroll Assigned Identifier
Header Record
Name
Description
Example
Data Type
Length
Required
File Position
File
Identifier
Identifies the file
as a valid Time
Sheet Import file.
This row must
contain a version
number.
##GENERIC## V1.0
Text
16
Y
Row 1
Field 1
Title Record
Name
Description
Example
Data Type
Length
Required
File Position
Company
Code Label
Column Title
IID, or Branch
Code+ADP
Code
Alphanumeric
15
Y
Row 2
Field 1
Pay
Frequency
Label
Column Title
Pay Frequency
Alphanumeric
13
Y
Row 2
Field 2
Pay Period
Start Date
Label
Column Title
Pay Period Start
Date
Alphanumeric
16
Y
Row 2
Field 3
Pay Period
End Date
Label
Column Title
Pay Period End
Date
Alphanumeric
14
Y
Row 2
Field 4
Employee ID
Label
Column Title
Employee ID
Alphanumeric
10
Y
Row 2
Field 5
Earnings
Code Label
Column Title
Earnings Code
Alphanumeric
13
Y
Row 2
Field 6
Hours Label
Column Title
Pay Hours
Alphanumeric
9
Y
Row 2
Field 7
Dollars Label
Column Title
Dollars
Alphanumeric
7
Y
Row 2
Field 8
Separate
Check Label
Column Title
Separate Check
Alphanumeric
14
Y
Row 2
Field 9
Worked In
Dept Label
Column Title
Worked In Dept
Alphanumeric
17
Y
Row 2
Field 10
Rate Code
Label
Column Title
Rate Code
Alphanumeric
9
Y
Row 2
Field 11

Time Sheet Import and RUN Powered by ADP® 6 Processing Your Payroll
Set Up Your Time Sheet Import File
Detail Record
Name
Description
Example
Data Type
Length
Required
File Position
Company
Code
A unique code
used to identify the
client.
RFCAV or
20026487
Text
10
Y
Pay
Frequency
Pay frequency for
the employees
included in the file.
The file can include
only one pay
frequency.
W
Text
10
Y
B = Biweekly
W = Weekly
S = Semimonthly
M = Monthly
Q = Quarterly
Pay Period
Start
The first date of the
pay period included
in the file.
02/14/2012
Date
10
Y
Pay Period
End
The end date of the
pay period included
in the file.
02/18/2012
Date
10
Y
Employee ID
A unique code,
assigned by the
payroll application,
used to identify the
employee.
2
Text
15
Y
Earnings
Code
Earnings code
associate with
hours on record.
REG
Text
10
Y
* See the
Earnings Codes
report
Pay Hours
Total hours worked
in pay period for
earnings code.
80.00
Numeric
[11.2]
N
Dollars
Total dollars paid in
the pay period for
earnings code.
2000.00
Numeric
[11.2]
N
Separate
Check
Separate check
value.
0
Numeric
2
Y
0-9
Worked
Department
Department where
employee worked.
Applicable only if
departments are
set up for company.
Numeric
6
N
* See the
Department
Numbers report
Rate Code
Pay rate that
should be applied
to the hours
worked.
BASE
Text
10
Y
BASE: First pay
rate defined for
hourly employee
RATE_2: Second
pay rate defined
for hourly
employee
RATE_3: Third
pay rate defined
for hourly
Time Sheet Import and RUN Powered by ADP® 7 Processing Your Payroll
Set Up Your Time Sheet Import File
employee
RATE_4: Fourth
pay rate defined
for hourly
employee
RATE_5: Fifth
pay rate defined
for hourly
employee
HRLY4SLRY1:
First hourly rate
defined for
salaried
employee
* For more information about these reports, see Data Resources for Set Up on page 3.
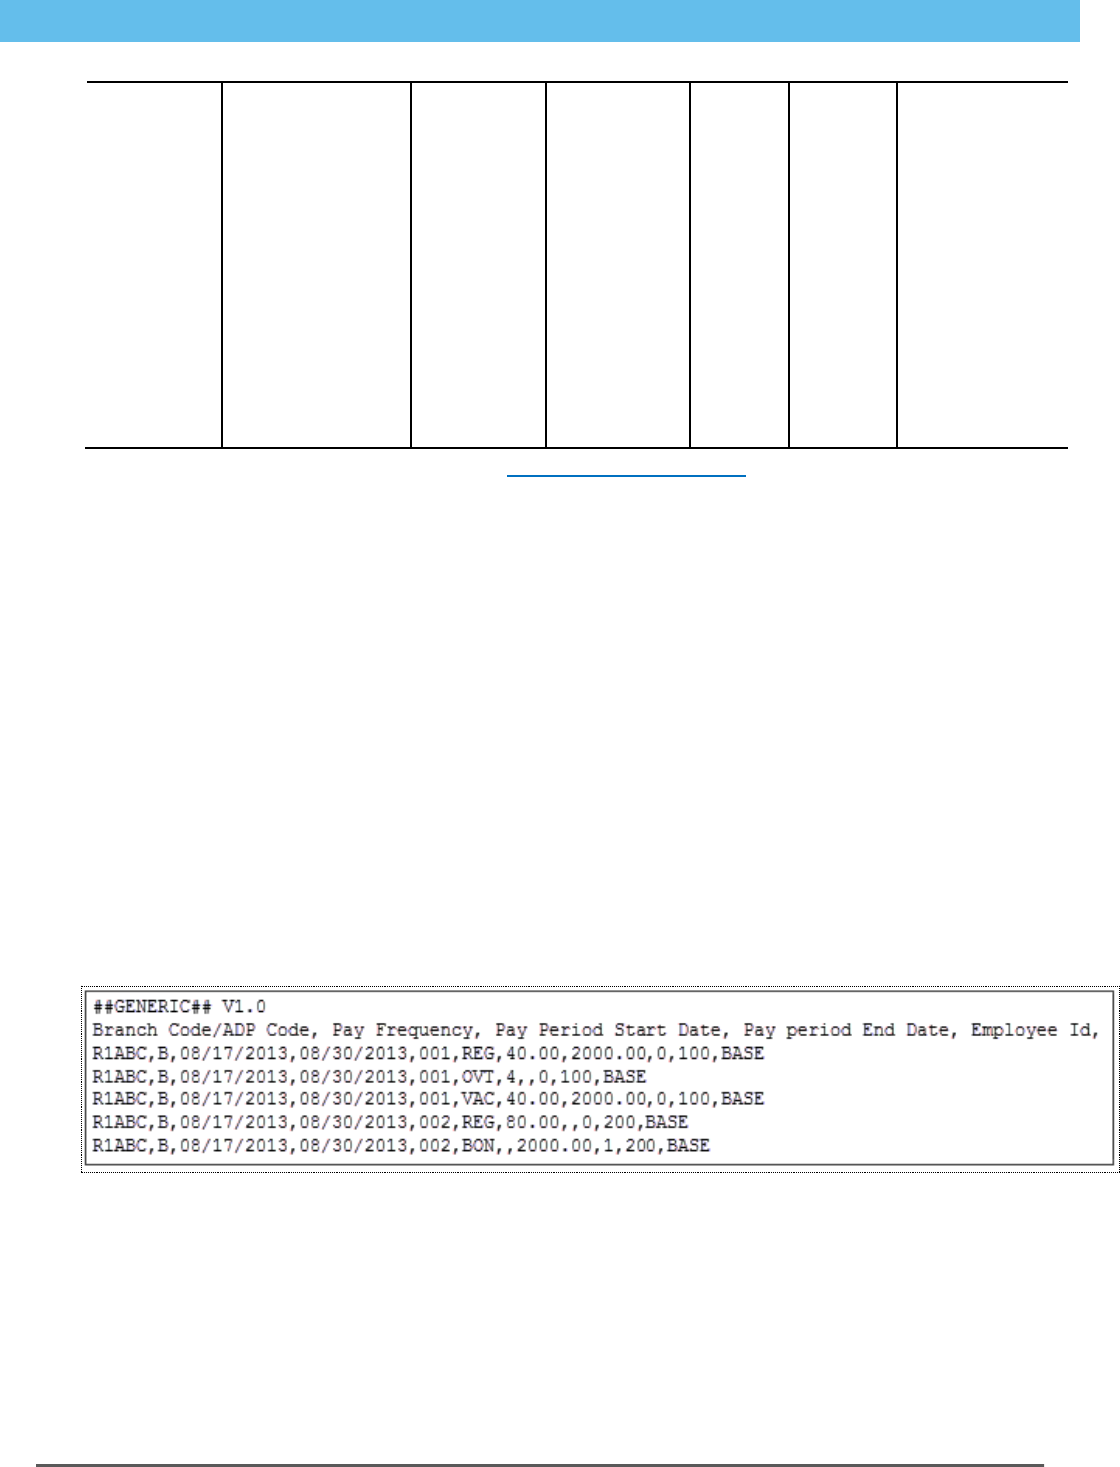
Sample Data
Company code ABC must create a time sheet import file to pay two employees for
the bi-weekly pay period starting on April 17, 2013.
Pay details for employee 001
Payroll check, Department 100, 40 regular hours, $2000 bi-weekly salary
amount
Payroll check, Department 100, 4 overtime hours
Payroll check, Department 100, 40 vacation hours
Pay details for employee 002
Payroll check, Department 200, 80 regular hours, $2000 bi-weekly salary
amount
Separate check, Department 200, $2000 bonus amount
Here is an example of company code ABC's time sheet import file, including the
header, title, and detail rows:

Time Sheet Import and RUN Powered by ADP® 8 Processing Your Payroll
Set Up Your Time Sheet Import File
Time Sheet File Record Layout Using Your Own Assigned Identifier
Header Record
Name
Description
Example
Data Type
Length
Required
File Position
File
Identifier
Identifies the file
as a valid Time
Sheet Import file.
This row must
contain a version
number.
##GENERIC## V1.0
Text
16
Y
Row 1
Field 1
Title Record
Name
Description
Example
Data Type
Length
Required
File Position
Company
Code Label
Column Title
IID, or Branch
Code+ADP
Code
Alphanumeric
15
Y
Row 2
Field 1
Pay
Frequency
Label
Column Title
Pay Frequency
Alphanumeric
13
Y
Row 2
Field 2
Pay Period
Start Date
Label
Column Title
Pay Period Start
Date
Alphanumeric
16
Y
Row 2
Field 3
Pay Period
End Date
Label
Column Title
Pay Period End
Date
Alphanumeric
14
Y
Row 2
Field 4
Employee
Time Clock
ID Label
Column Title
Employee Time
Clock ID
Alphanumeric
22
Y
Row 2
Field 5
Earnings
Code Label
Column Title
Earnings Code
Alphanumeric
13
Y
Row 2
Field 6
Hours Label
Column Title
Pay Hours
Alphanumeric
9
Y
Row 2
Field 7
Dollars Label
Column Title
Dollars
Alphanumeric
7
Y
Row 2
Field 8
Separate
Check Label
Column Title
Separate Check
Alphanumeric
14
Y
Row 2
Field 9
Worked In
Dept Label
Column Title
Worked In Dept
Alphanumeric
17
Y
Row 2
Field 10
Rate Code
Label
Column Title
Rate Code
Alphanumeric
9
Y
Row 2
Field 11

Time Sheet Import and RUN Powered by ADP® 9 Processing Your Payroll
Set Up Your Time Sheet Import File
Detail Record
Name
Description
Example
Data Type
Length
Required
File Position
Company
Code
A unique code
used to identify the
client.
RFCAV or
20026487
Text
10
Y
Pa
Frequency
Pay frequency for
the employees
included in the file.
The file can include
only one pay
frequency.
W
Text
10
Y
B = Biweekly
W = Weekly
S = Semimonthly
M = Monthly
Q = Quarterly
Pay Period
Start
The first date of the
pay period included
in the file.
02/14/2012
Date
10
Y
Pay Period
End
The end date of the
pay period included
in the file.
02/18/2012
Date
10
Y
Employee
Time Clock
ID
A unique code,
assigned by your
time and
attendance system,
used to identify the
employee.
JSmith1
Text
15
Y
Earnings
Code
Earnings code
associate with
hours on record.
REG
Text
10
Y
* See the
Earnings Codes
report
Pay Hours
Total hours worked
in pay period for
earnings code.
80.00
Numeric
[11.2]
N
Dollars
Total dollars paid in
the pay period for
earnings code.
2000.00
Numeric
[11.2]
N
Separate
Check
Separate check
value.
0
Numeric
2
Y
0-9
Worked
Department
Department where
employee worked.
Applicable only if
departments are
set up for company.
Numeric
6
N
* See the
Department
Numbers report
Rate Code
Pay rate that
should be applied
to the hours
worked.
BASE
Text
10
Y
BASE: First pay
rate defined for
hourly employee
RATE_2: Second
pay rate defined
for hourly
employee
Time Sheet Import and RUN Powered by ADP® 10 Processing Your Payroll
Set Up Your Time Sheet Import File
RATE_3: Third
pay rate defined
for hourly
employee
RATE_4: Fourth
pay rate defined
for hourly
employee
RATE_5: Fifth
pay rate defined
for hourly
employee
HRLY4SLRY1:
First hourly rate
defined for
salaried
employee
* For more information about these reports, see Data Resources for Set Up on page 3.
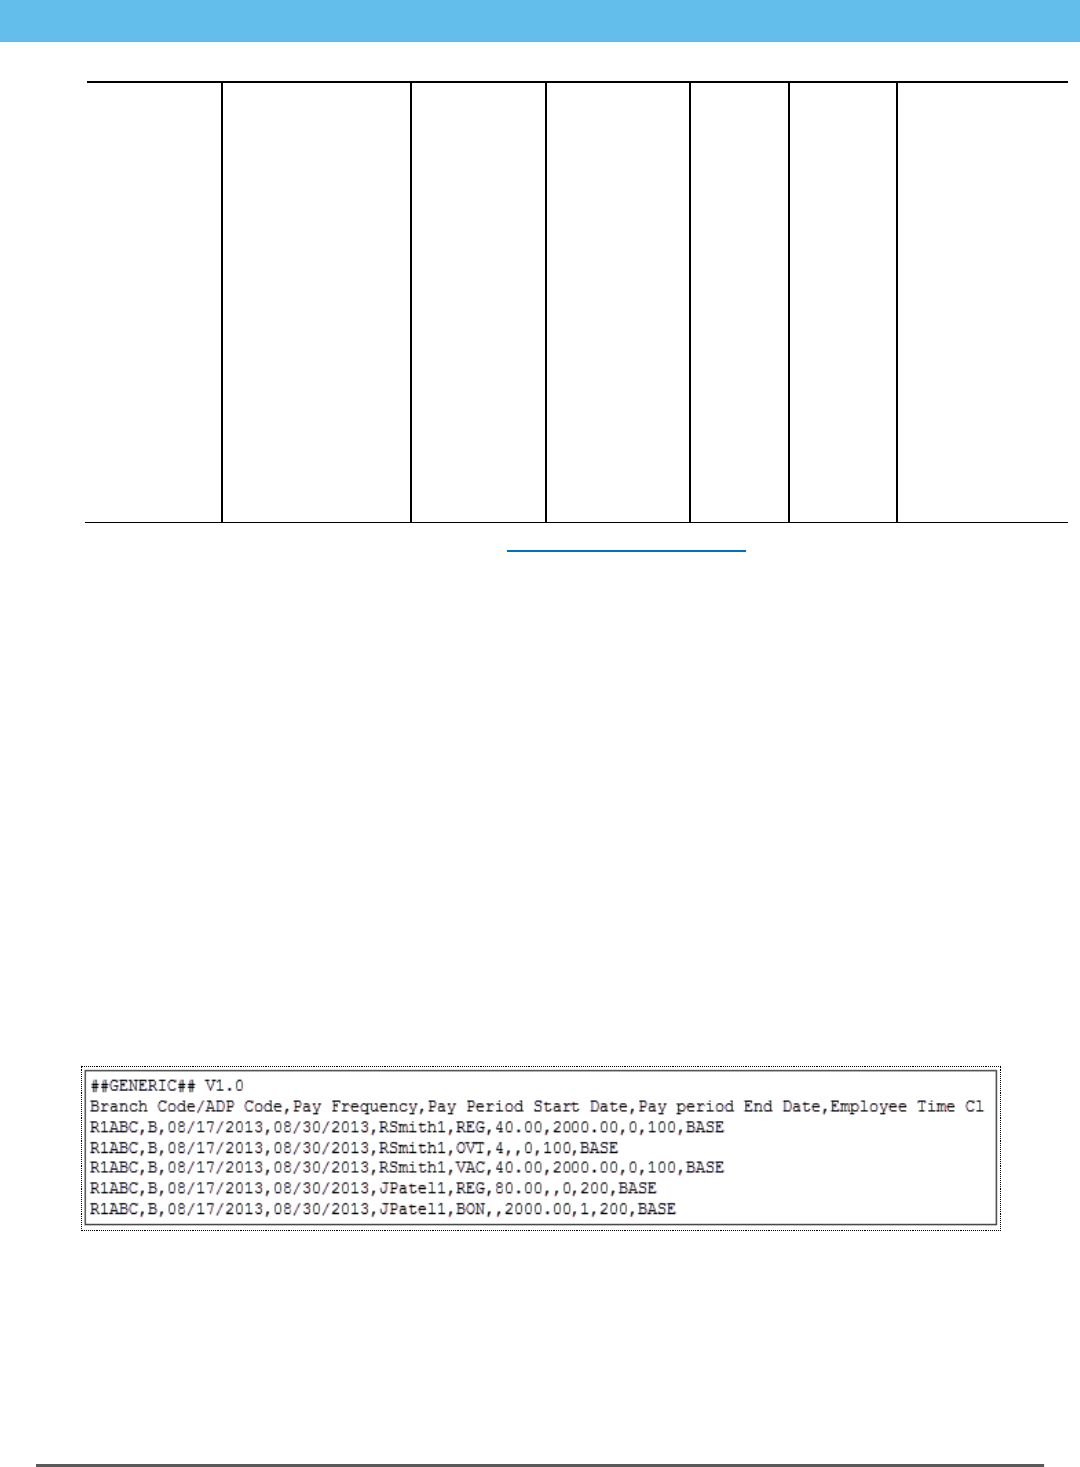
Sample Data
Company code ABC must create a time sheet import file to pay two employees for
the bi-weekly pay period starting on April 17, 2013.
Pay details for employee RSmith1
Payroll check, Department 100, 40 regular hours, $2000 bi-weekly salary
amount
Payroll check, Department 100, 4 overtime hours
Payroll check, Department 100, 40 vacation hours
Pay details for employee JPatel1
Payroll check, Department 200, 80 regular hours, $2000 bi-weekly salary
amount
Separate check, Department 200, $2000 bonus amount
Here is an example of company code ABC's time sheet import file, including the
header, title, and detail rows:
Time Sheet Import and RUN Powered by ADP® 11 Processing Your Payroll
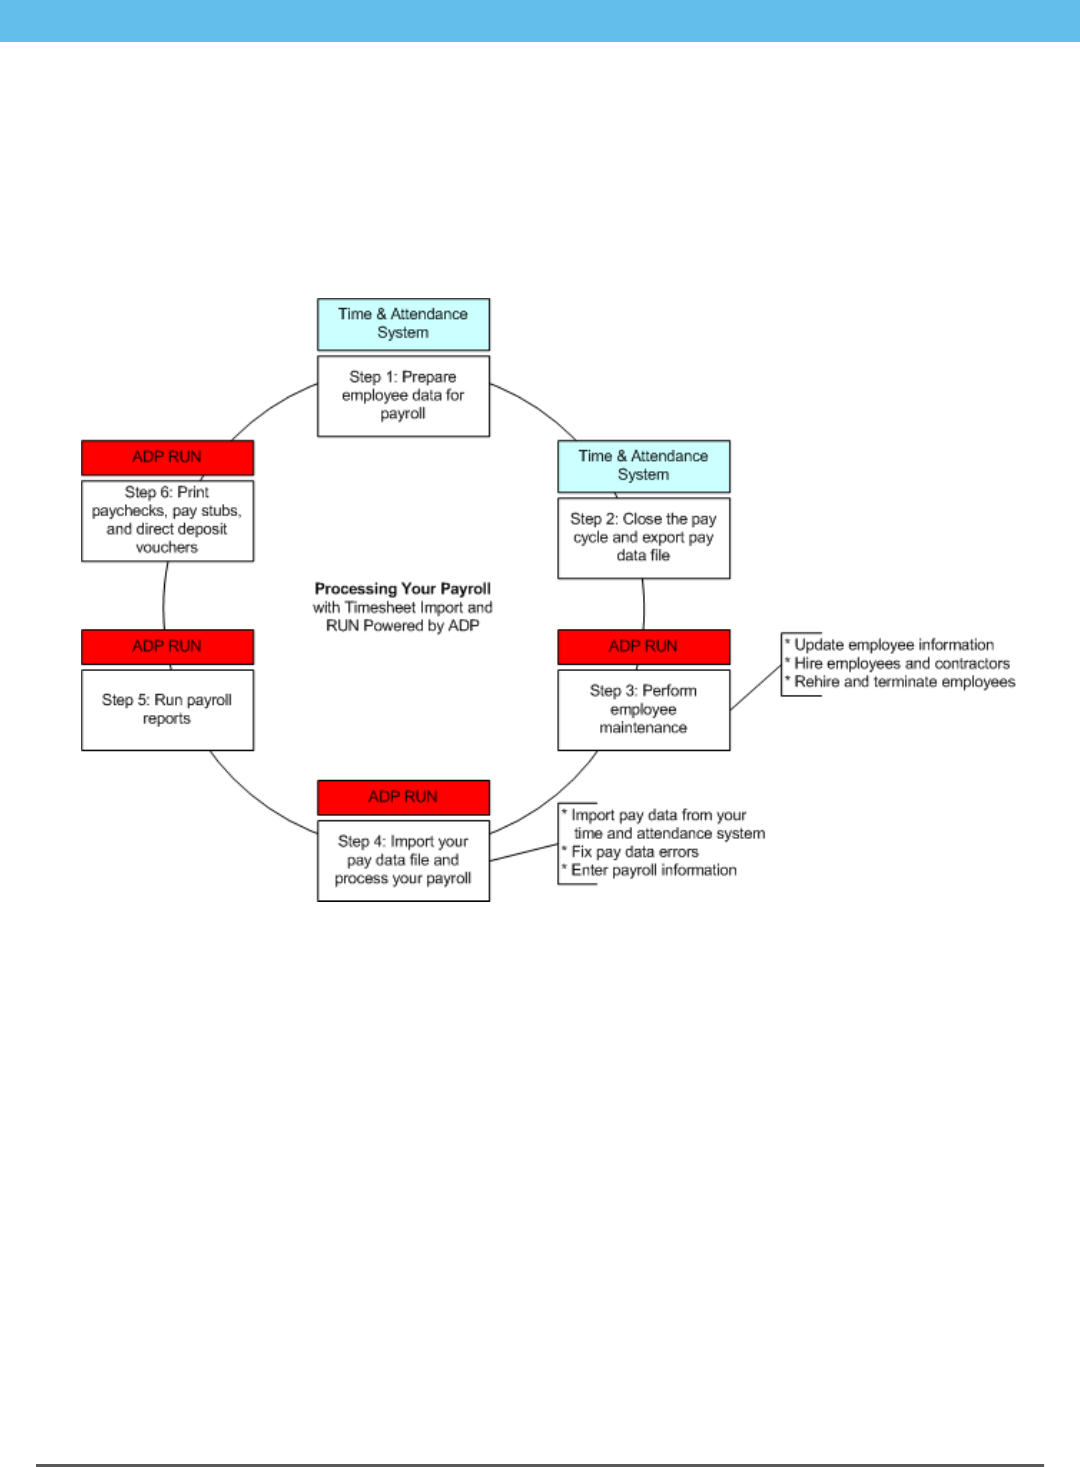
The Payroll Process
The Payroll Process
The following diagram provides an overview of the steps you will take to pay your
employees with the payroll application using data imported from your time and
attendance system.

Time Sheet Import and RUN Powered by ADP® 12 Processing Your Payroll
Perform Employee Maintenance
Perform Employee Maintenance
Before you process your payroll, you must update any employee information in the
payroll application that has changed since the last payroll.
Update Employee and Contractor Information
To ensure that paychecks are accurate, make sure you update information for all
employees and contractors before you process the payroll. For example, if an
employee moves from one jurisdiction to another, the taxation rules for that new
jurisdiction may impact the employee’s paycheck. It's easier to change the
jurisdiction before you process the payroll instead of tracking down and correcting
any errors later. You should also complete the New Hire Wizard for any new
employees or contractors that you want to include in the payroll.
Add Employees
The New Hire Wizard guides you through each of the pages that you need to
complete to set up your employees successfully. For help on a particular field or
page, click . The Help window includes help for the current page. To search for
additional help, click the Search tab.
Starting Point: Employees > Add Employee
The steps to add the employee are displayed across the top of the page. The
highlighted step shows you where you are in the process.
1 On each page, complete each of the required fields, and any additional fields as
necessary for the employee.
2 When you complete a page, click Next to go to the next page.
Tip: If you need to take a break, click Finish Later in the bottom-right corner of the
page. When you are ready to continue hiring the employee, click the next task in the
To Do section on the Payroll Home page. The New Hire Wizard opens on the page
where you left off.

Time Sheet Import and RUN Powered by ADP® 13 Processing Your Payroll
Perform Employee Maintenance
How Do I Add a Contractor?
Before You Begin: This procedure describes how to add a contractor after you set
up your company and employees and begin processing payrolls. If you are setting
up the payroll application and have not yet set up your contractors, search for
Setting Up Employees and Contractors in the online help.
The New Hire Wizard guides you through each of the pages that you need to
complete to set up your contractors successfully. If you need help on a field,
click . The Help window includes help for the current page. To search for
additional help, click the Search tab.
Starting Point: Employees > Add Contractor
The steps to add the contractor are displayed across the top of the page. The
highlighted step shows you where you are in the process.
1 On each page, complete each of the required fields, and any additional fields as
necessary for the contractor.
2 When you complete a page, click Next to go to the next page.
Tip: If you need to take a break, click Finish Later in the bottom-right corner of the
page. When you are ready to continue hiring the contractor, click the next task in the
To Do area on the Payroll Home page. The New Hire Wizard opens on the page
where you left off.

Time Sheet Import and RUN Powered by ADP® 14 Processing Your Payroll
Perform Employee Maintenance
Rehire Employees
Important: To be sure that the employee's former earnings, deductions, and tax
information are reactivated, follow these steps rather than using the New Hire
Wizard to rehire an employee.
Starting Point: Employees > Directory
1 In the Status field, select All to include terminated employees in the list.
2 Click the employee you want to rehire.
3 In the left menu, click Personal Information > Employment Info.
4 To the right of the Termination Date field, click Rehire.
5 Click OK to confirm that you want to reactivate the earnings, deductions, and tax
information.
The Employee Status is automatically changed from Terminated to Active, and
the Termination date is deleted.
6 In the Hire Date field, enter the date the employee was rehired.
7 Review the remaining fields and make any necessary changes.
8 Click Save to save your changes.
9 On each of the Employee pages, verify the employee's information--especially
taxes, deductions, and direct deposit information--and make any necessary
changes.
The employee will be included in the Payroll Worksheet, starting with the pay period
that includes the rehire date.
Terminate Employees
Starting Point: Employees > Directory
1 Click the employee to open the Employee Info page.
2 In the left menu, click Personal Information > Employment Info.
3 In the Employee Status field, select Terminated as the employee’s new status.
4 In the Termination Date field, enter the date of the employee’s last day of work.
5 In the Termination Reason field, select the reason that best explains why the
employee was terminated.
6 Click Save to save your changes.

Time Sheet Import and RUN Powered by ADP® 15 Processing Your Payroll
Pay Your Employees and Contractors
Pay Your Employees and Contractors
The following tasks outline the process of paying your employees using the payroll
application. Details are provided for each task.
Import Time Sheet Data from My Time and Attendance System on page 15.
Fix Errors in the Time Sheet Import File on page 16.
Enter Payroll Information on page 17.
Import Time Sheet Data from My Time and Attendance System
Important: You can only import time sheet data for one pay frequency at a time. If
there is already a file for the pay frequency that is Pending or Approved, you must
finish importing that file before you can import another one. You can import multiple
files only if each one is for a different pay frequency.
Starting Point: Home > Time Sheet Import
1 On the Time Sheet Import page, if your company has only one pay frequency,
go to Step 3.
2 If your company has more than one pay frequency, select the pay frequency for
the time sheet data you want to import from your time and attendance system.
3 On the Pay Data Import page, click Browse, and then locate the file you want to
import.
4 Click Import Pay Data.
If there are errors, the Pay Data Errors page is displayed. See Fix Errors in the
Time Sheet Import File on page 16.
If there are no errors or warnings, the Pay Data Approval page is displayed.
5 On the Pay Data Approval page, review the time sheet import data and verify
that it is correct.
The Regular Hours Payroll column lists any hours that were generated
automatically or entered in the Payroll Worksheet.
The Regular Hours Import column lists the hours that were imported from your
time and attendance system.
If you imported the wrong time sheet import file, click Delete this Pay Data File
to delete the file and go back to the Pay Data Import page.
6 To combine the Regular Hours Imported and the Regular Hours Payroll for all
employees, click Combine Payroll and Import.
To use only the Regular Hours Imported and not the Regular Hours Payroll,
click Accept Import Only.

Time Sheet Import and RUN Powered by ADP® 16 Processing Your Payroll
Pay Your Employees and Contractors
7 Click Approve to open the Payroll Worksheet for this payroll.
The data displayed in the grid includes imported data, plus any data that was
already entered for this payroll or that was generated automatically. If there are
employees who are paid in this pay frequency but are not set up in your time
and attendance system, they will be included in the Payroll Worksheet.
8 Make any necessary changes, and continue processing your payroll.
Fix Errors in the Time Sheet Import File
When you import your time sheet import file from your time and attendance system,
you may encounter file and data errors on the Pay Data Errors page.
For some errors, you will have to import another time sheet import file or make
configuration changes. For other errors, you may want to:
Fix the data in your time and attendance system. If you need fix the error in
your time and attendance system, you will need to re-create the file in that
system and then import the new time sheet import file into the payroll
application.
Fix the error in the payroll application. You can cancel the import and fix the
errors in the payroll application. When the errors are fixed, you can continue
with the import where you left off.
Ignore the error and continue importing the time sheet import file. If the
error is for a specific employee, earning, or rate, you can ignore the error and
continue. Depending on the error, you may be able to fix it for the payroll by
entering or changing data in the Payroll Worksheet.
Important: If you make a change in the payroll application, make sure you make the
same change in your time and attendance system.

Time Sheet Import and RUN Powered by ADP® 17 Processing Your Payroll
Pay Your Employees and Contractors
Enter Payroll Information
After you import the time sheet import file from your time and attendance system
and correct any import error, the Payroll Worksheet is displayed.
Active employees and contractors are listed in rows down the left side of their
respective pages in the Worksheet. If you are entering payroll information for both
employees and contractors, you must enter the employee information first. When
you have completed all employee payroll entries, click Next to go to the contractor
page of the Payroll Worksheet.
Earnings are listed in columns across the top of the Worksheet. There is a column
representing each earning that is set up for the company on the Earnings and
Deductions Info page. For contractors, there is a column representing each type of
1099 earning. The Payroll Worksheet is already filled in with the standard hours set
up for employees on the Payroll Info page, and any data that you imported from
your time and attendance system.
For each employee and contractor, review the amount or number of hours for each
applicable earning and make changes as necessary.
For details on how to change an employee’s taxes or deductions for this pay period
only, set up a second check for an employee, or pay an employee who works in
more than one department or who has more than one pay rate, click in the
upper-right corner of the page.

Time Sheet Import and RUN Powered by ADP® 18 Processing Your Payroll
Run Reports
Run Reports
Before You Begin: You must process at least one payroll before you can run most
reports.
Starting Point: Reports
1 Click the name of the report you want to run.
2 The report is displayed using the default report parameters.
3 In the Report Parameters area, select the parameters you want to use to run the
report, and then click Refresh.
4 Some reports include blue links that you can click to display additional report
information. For example, the Payroll Summary report lists a summary of the
employer tax and deductions totals, which are listed by check date. To see
detail amounts for a specific employee, click Check Date in the Summary report
to open the detailed report for that employee.
5 To print the report, click Print Report in the bottom-left corner of the report
page. To export the report, click Export to Excel in the bottom-left corner of the
report page.
6 When you're done, click Close to close the report and go back to the Reports
Home page.

Time Sheet Import and RUN Powered by ADP® 19 Processing Your Payroll
Printing Paychecks
Printing Paychecks
After you process your payroll, you can print the paychecks. You can also print
vouchers for any employees or contractors who have some or all of their net pay
deposited directly to a bank or a financial institution such as a credit union.
For more information on printing paychecks, pay stubs, or pay vouchers, search for
How Do I Print Paychecks?, How Do I Print Pay Stubs?, or How Do I Print
Direct Deposit Vouchers? in the online help.
Print Paychecks
This topic applies only if you print your own paychecks.
Before You Begin: Load your check stock and, if necessary, print a test check. For
more information, search for How Do I Print a Test Check? In the online help.
The process for printing checks and vouchers varies a bit depending on the browser
you are using. For details, search for Requirements for Printing Checks and
Vouchers in the online help.
Starting Point: Home > Checks
1 At the top of the page, verify the Date and the Pay Frequency of the payroll.
2 In the Check Stock Type field, select the check stock type you use for checks.
3 To see a sample of the options available, click View Types.
4 In the Next Check Number field, enter the number of the first check you are
printing for this pay period. If you are using pre-printed check stock, enter the
number of the first check.
5 Depending on your browser, verify that the option selected in the Printer or
Check Alignment field is correct.
6 Select the check box for each of the checks you want to print. Checks are listed
alphabetically by the employee's or contractor's name. You can only select
checks with a status of Ready in the Status column on the grid.
7 To print all the paychecks in your payroll that are ready for printing, select the
check box at the top of the check box column in the grid.
8 At the bottom of the page, click Create PDF to Print. In the Print window, click
Print to print your checks and then close the window.
9 If you have checks to print for another payroll, click Next to go to the Print
Checks page.
10 If you don't want to print any more checks, click Cancel to go back to the Payroll
Home page.

Time Sheet Import and RUN Powered by ADP® 20 Processing Your Payroll
Printing Paychecks
Print Direct Deposit Vouchers
This topic applies only if you print your own paychecks.
The process for printing checks and vouchers varies a bit depending on the browser
you are using. For details, search for Browser Requirements for Printing Checks
and Vouchers in the online help.
Starting Point: Home > Direct Deposit Vouchers
1 Select the Check Stock Type you are using.
2 Verify that the option selected in the Voucher Alignment field is correct.
3 Verify the date and the pay frequency of the payroll at the top of the page.
4 Select the check box for each of the direct deposit vouchers you want to print.
Note: Vouchers are listed alphabetically by employee last name. To print all the
vouchers that are ready for printing, select the check box at the top of the
column in the grid. The check box is not available for any voucher that has
already been printed.
5 At the bottom of the page, click Create PDF to Print. In the Print window, click
Print to print your checks and then close the window.
6 A single direct deposit voucher is printed for employees and contractors who
deposit all of their pay into a single account in a bank or other financial
institution. A single direct deposit voucher is also printed for employees and
contractors whose pay is distributed among multiple direct deposit accounts. All
direct deposit distributions for the employee or contractor are shown on the
single voucher.
Important: A direct deposit voucher is not available for employees and
contractors who deposit some of their pay and who receive the remainder as a
check. When you print the check for these employees and contractors, the direct
deposit information is listed on the pay stub for the check.
7 When all the direct deposit vouchers you selected have printed, click Next to
display another pay frequency with the same check date. If your payroll does not
include another pay frequency, direct deposit voucher information for your next
payroll is displayed and vouchers are available for printing. When all direct
deposit vouchers have been printed, click Cancel to go back to the Payroll
Home page.

Time Sheet Import and RUN Powered by ADP® 21 Processing Your Payroll
Move the Pay Cycle to the Next Pay Period
Move the Pay Cycle to the Next Pay Period
After you verify that your paychecks are accurate, move the pay cycle to the next
pay period in your time and attendance system.

Time Sheet Import and RUN Powered by ADP® 22 Processing Your Payroll
Appendix: Understanding Time Sheet Import Errors
Appendix: Understanding Time Sheet Import Errors
The following chart provides information on how to fix the errors you might
encounter when you import time sheet import files. Errors are listed in the order of
the error number, for example 34612.
Information that changes depending on the message, such as a company code, pay
frequency, or employee identifier is represented using the %% symbol.
Message
What to Do Next
35015: We noticed that your pay data
import file doesn't include a company
code. Please select a different file.
Make sure you selected the correct file or update the
company code in your time and attendance system, and
then import the file again.
35096: We noticed the pay data import
file you selected includes more than one
company code. Only one company code
can be imported at a time.
Update your time and attendance system to include only
one company code, and then import the file again.
34608: This file type isn't valid. Make
sure you select the file type that you
exported from your time and attendance
system...
If you continue to get this error, contact your Payroll
Service team.
34609: It looks like the company code,
%%1, in your pay data import file isn't
correct. Try selecting a different file, or if
you selected the correct file, try updating
the data in your time and attendance
system with the correct company code.
Then, import the file again.
If you continue to get this error, contact your Payroll
Service team.
34610: Your pay data import file includes
data for more than one company code.
We didn't import data for company code
(%%1).
We imported data only for the company code that matches
the current company in your payroll application. We didn't
import data for company code (%%1).
34611: It looks like the pay frequency
(%%1) in your pay data import file
doesn't match the pay frequency of this
payroll. Make sure you selected the
correct time sheet file for this pay
frequency.
If this is the correct file, then check the Pay Frequency
page from the Company tab and add the correct pay
frequency, if needed. If you continue to get this error,
contact your Payroll Service team.
34612: The pay period start and end
dates (%%1 - %%2) in payroll don't
match the pay period start and end dates
(%%3 - %%4) in your time and
attendance system for this payroll. Make
sure you imported the current pay data
import file or correct the pay periods
dates in time and attendance. We will
use (%%3-%%4) for this payroll.
Make sure you imported the current pay data import file or
correct the pay periods dates in time and attendance. We
will use (%%3-%%4) for this payroll.

Time Sheet Import and RUN Powered by ADP® 23 Processing Your Payroll
Appendix: Understanding Time Sheet Import Errors
Message
What to Do Next
34613: It looks like your pay data import
file contains an employee (%%1) that
does not exist in your payroll. Pay data
was not imported for this employee.
To pay this employee, verify you have the correct
employee number or try hiring the employee in the payroll
application and entering the hours in the Payroll Worksheet
34614: We noticed that the employee’s
hire date (%%1) is after the period end
date (%%2) for the current payroll. Pay
data was not imported for this employee.
To include this employee's pay data,
change the hire date in payroll and
reimport the pay data
To pay this employee, change the hire date on the Payroll
Info page.
34616: There aren't any employees that
match the pay frequency (%%1) in this
pay data file. Make sure you have the
correct file or make any needed changes
to your employees' pay frequency on the
Payroll Info page and import the pay data
file again.
If you still get this error, contact your Payroll Service team.
34617: This employee's pay frequency
%%1 doesn't match the pay frequency
%%2 in the time sheet file, and we
couldn't import this employee's time. Try
changing the employee's pay frequency
in payroll and, if necessary, adjust the
pay rate. Then, enter the employee's
hours in the Payroll Worksheet.
For the next payroll, make sure the pay frequency on the
Payroll Info page matches the pay group in your time and
attendance system.
35102: We couldn't import this
employee's time because the employee's
status is Leave of Absence in payroll.
Try changing the status to Active in the payroll application
on the Employment Info page. Then, enter the employee's
hours in the Payroll Worksheet.
35105: It looks like this employee has
time included in the pay data file, but has
a Terminated status in payroll. If the
employee's termination date is after the
start date of the next payroll, then time
will be imported for this employee
If pay data wasn't imported and you want to pay the
employee, try changing the termination date on the
Employment Info page so it is during or after the pay period
dates, and update the employee's hours in the Payroll
Worksheet. If you don't want to pay the employee, then
delete the pay data in the Payroll Worksheet.
34622: It looks like the earnings code
%%1 isn't correct and we couldn't import
pay data for this earning.
Contact your Payroll Service team for assistance with this
earning.
34623: It looks like the earnings code
%%1 isn't active in the payroll
application, and the pay data can't be
imported. Can you change %%1 to an
active earning code?
Make sure the earning is set up and active for the company
on the Company Earnings and Deductions page, and enter
pay data for the employee in the Payroll Worksheet.

Time Sheet Import and RUN Powered by ADP® 24 Processing Your Payroll
Appendix: Understanding Time Sheet Import Errors
Message
What to Do Next
34624: We couldn't import hours for this
earning. It looks like the %%1 earning
isn't valid for this employee, because the
payroll application supports an amount,
not hours, for this earning
Try updating the earning on the Company Earnings and
Deductions page in the payroll application, or contact your
Payroll Service team.
34625: We couldn't import the amount for
this earning. It looks like the %%1
earning isn't valid for this employee
because the payroll application supports
hours, not an amount, for this earning.
Try updating the earning on the Company Earnings and
Deductions page in the payroll application, or contact your
Payroll Service team.
34626: It looks like department %%1 isn't
valid and we couldn't import pay data for
this department.
Try setting up the department in RUN and assigning it to
the employee. Then, manually add the department to your
time and attendance system.
34631: This file type is not valid. Try
saving it as a valid file type or try
selecting a different file.
If you continue to get this error, contact your Payroll
Service team.
34636: We couldn't import pay data for
this earning because the %%1 earning is
used for employees and not for
contractors.
To pay the contractor in the current payroll, enter pay data
in the Payroll Worksheet. For the next payroll, assign a
different earnings code in the time card, or contact your
Payroll Service team to set up a new earnings code.
34637: We couldn't import pay data for
this earning because the %%1 earning is
used for contractors and not for
employees.
To pay the employee in the current payroll, enter pay data
in the Payroll Worksheet. For the next payroll, assign a
different earnings code in the time card, or contact your
Payroll Service team to set up a new earnings code.
34638: It looks like you don't have the
correct number of hours for this earning
and the hours weren't imported. The
%%1 hours earning must be from %%2
to %%3.
Try entering the correct number of hours in the Payroll
Worksheet. You can also correct the earnings hours in
your time and attendance system, regenerate the time
sheet import file, and import it into the payroll application
again.
34639: It looks like the %%1 earnings
amount isn't correct and it wasn't
imported. The %%1 earnings amount
must be from %%2 to %%3.
Try entering the correct amount for the earning in the
Payroll Worksheet. You can also correct the earnings
hours in your time and attendance system, regenerate the
time sheet import file, and import it into the payroll
application again.
34640: We couldn't import pay data for
the separate check %%1.
Try creating an additional check for the employee in the
Payroll Worksheet. You can enter up to nine additional
checks for an employee in the payroll application.
34656: We couldn't import pay data for
the rate code %%1.
Contact your Payroll Service team for assistance with this
error.

Time Sheet Import and RUN Powered by ADP® 25 Processing Your Payroll
Appendix: Understanding Time Sheet Import Errors
Message
What to Do Next
34680: We couldn't import pay data for
the %%1 rate %%2. To pay the
employee, enter the correct rate in the
Payroll Worksheet.
For the next payroll, enter the rate on the Payroll Info page
in the payroll application. If you need to correct the rate
configuration in your time and attendance system, contact
your Payroll Service team.
